
100% Attended Transfers for Unique Audio Recordings
NEDCC’s Audio Preservation department performs 1:1, 100%-attended transfers of unique magnetic or digital audio tapes and discs. What exactly does this mean? In the NEDCC Audio Preservation Control Rooms, one audio engineer transfers one recording at a time and listens to the complete transfer.
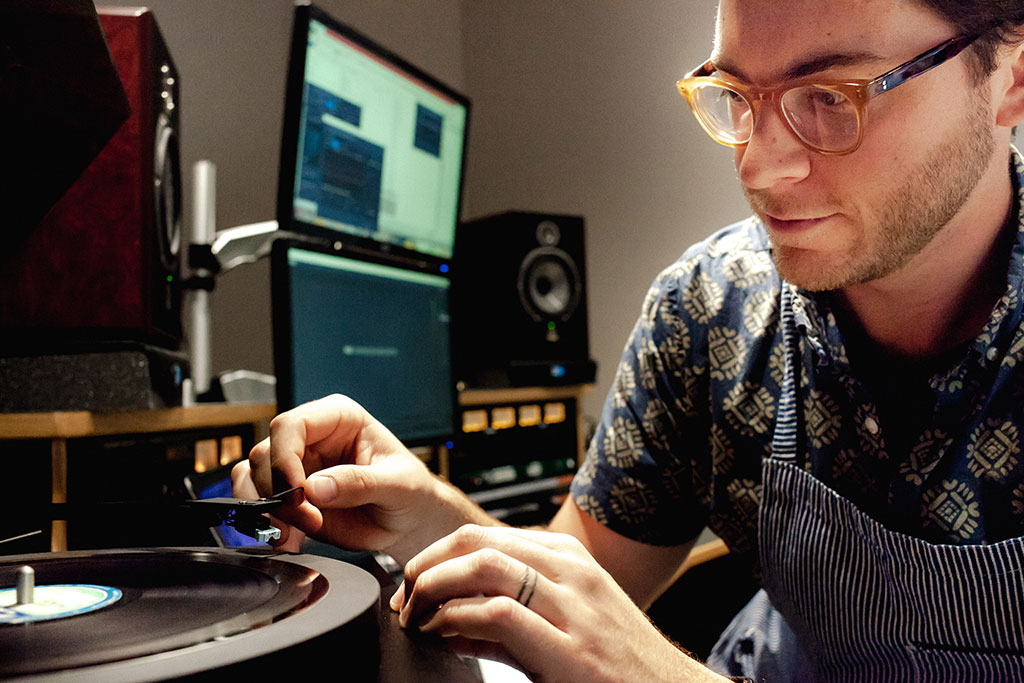 Careful listening is how we guarantee that the digital audio file created is a faithful and accurate representation of the original analog version, while minimizing the risk of damage to the carrier. The engineer watches for breaks or other problems and attends to them right away. So, we’re listening for a lot more than the content.
An added perk for our audio engineers during this process is that they get to hear a lot of unique content––from field-recorded, toe-tapping tunes to original radio broadcasts and oral histories documenting national, local and personal accounts of historical events.
WHAT WE LISTEN FOR
To offer an idea of a typical day in the control rooms, we’ve created some examples below of what our engineers look and listen for throughout the transfer process to guarantee that the resulting file is a true preservation surrogate. Some of these examples are subtle so we recommend listening with nice speakers or headphones.
(Because we respect the privacy of our clients’ collections, we’ve transferred a commercial rather than a unique recording to serve as an example. The examples below were created from The Velvet Underground, self-titled album on ¼” open-reel tape and James Brown and the Famous Flames’ “I Can’t Stand Myself When You Touch Me” LP vinyl disc.)
01: Baseline: Audio with no Issues
LISTEN:
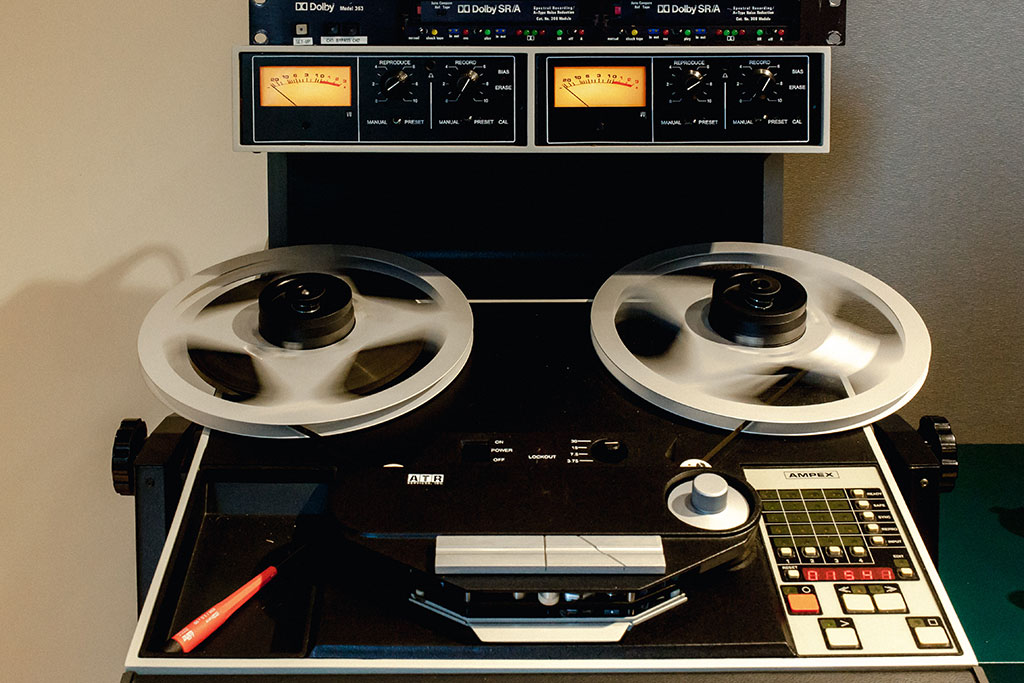
To start, this is an example of a 1/4” open-reel tape from 1969 that has no issues. It is a stereo recording which means that the left and right channels feature different, but related, content. Most music that we listen to today is stereo. Notice the drums in the left channel and the rhythm guitar in the right. This tape has been transferred on our ATR-102 1/4" open-reel tape machine with the correct playback head which has been aligned specifically for this tape.
02: Misaligned Azimuth
LISTEN:
Azimuth refers to the clockwise or counterclockwise orientation of the tape machine’s playback head. It is critical to have the azimuth properly matched to the tape because any slight misalignment will pick up the signal at slightly the wrong time relative to the other channel. This manifests most audibly in a loss of high-frequency content. Go back and forth from example 01 and 02 and listen especially to the high-frequency snap (and then the lack of) in the snare drum in the left channel.
03: Out of Phase (inverted polarity)
LISTEN:
Polarity refers to the positive and negative values of an audio waveform. Occasionally, audio can get recorded with inverted polarity either by operator error or equipment malfunction. This is also informally referred to as, “out of phase”. When this happens, certain frequencies can be emphasized or eliminated when two or more channels of audio are compared to each other. The figure below shows how two simple waveforms of opposite polarity cancel each other out when they are added together (summed from stereo to mono).
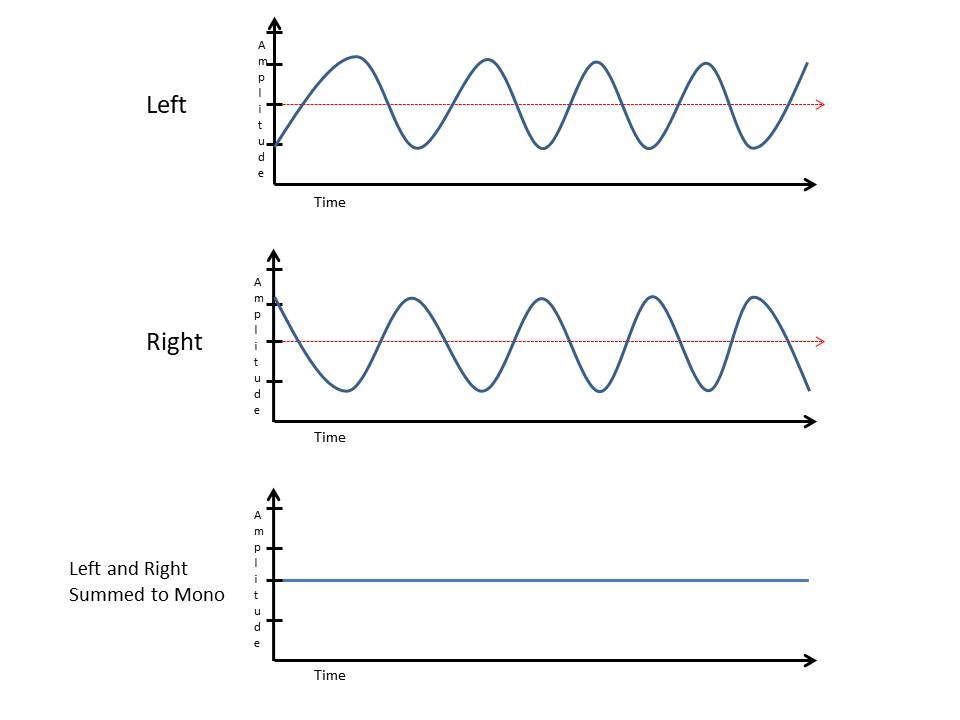
In this example, the polarity of the right channel has been inverted and is now “out of phase” with the other channel. Switch back and forth between this example 03 and example 01. Listen for the bass guitar, which is in the center of the stereo image. Sounds that are in the center of the stereo image are most-susceptible to phase problems. In example 01, the bass guitar is clear and each note played is distinguishable. In example 03, the bass virtually disappears.
04: Wrong Playback Head
LISTEN:
Quarter-inch (1/4”) open reel tape machines can be equipped with three different kinds of record and playback heads: full-track, half-track, and 1/4-track. Each distinguishes how much of the width of the tape is used to store the audio. When digitizing audio collections, it is necessary to play the tape with the correct head. It’s not uncommon for amateur and field recordings to change track configuration throughout.

In this example, the tape was recorded as 1/4-track stereo. This means that the recording was split into four discreet sections along the width of the tape and these four sections are paired into two stereo channels. These two stereo channels are recorded in opposite directions. The tape operator can play the tape with the 1/4-track head in one direction and get stereo. The operator can then flip the tape over and get even more stereo content. If you play a 1/4-track stereo tape with the 1/2-track playback head, you will hear the overlap from the other content, in the opposite direction. The figure above shows the channel layout of a 1/4-track stereo recording.
05: Wrong Speed: too Fast
LISTEN:
With magnetic recording, audio is recorded as the tape passes over the record head of the tape machine. The speed at which the tape travels can be changed depending on the needs of the operator. A slower speed will allow the operator to record for a longer amount of time but with lower resolution. Conversely, a faster speed will allow for a shorter recording time but the resolution will be higher. Tape speeds are measured in “inches per second” (ips). Standard recording speeds are 15/16 ips, 1⅞ ips, 3¾ ips, 7½ ips, 15 ips, and 30 ips. The most common speeds for amateur and field recordings are 3¾ ips and 7½ ips. Similar to track configuration, it’s not uncommon for amateur and field recordings to change recording speed throughout.
This example shows the audio at twice the original recording speed.
06: Wrong Speed: Too Slow
LISTEN:
This example shows the audio at half the original recording speed.
07: Audio Restoration: De-click
LISTEN:
So far we’ve highlighted examples of issues that we look out for in the creation of our preservation master files. This involves making sure that the settings are correct on our playback equipment in order to most accurately capture the audio. We never do any kind of post processing for the preservation master files. We do, however, provide access copies of the audio with some restoration work for ease of listening.
We are equipped to perform several kinds of audio restoration for the access copies including corrective equalization, noise reduction, and de-clicking. With grooved media, clicks come from any debris, excessive wear, and/or scratches in the groove. This audio comes from a disc that is in poor condition – it is scratched and dirty. This is an example of de-clicking. Example 07 alternates every 5 seconds from the raw audio to “de-clicked” audio.
CLIPPING
In addition to listening for anomalies, we keep an eye on our meters to make sure we do not “clip” (distort) the recording of the preservation master file. Clipping happens when the amplitude of the analog signal exceeds the linear limits of the analog-to-digital conversion process. This is not always obvious while listening but we check our meters and make sure the recording did not clip.
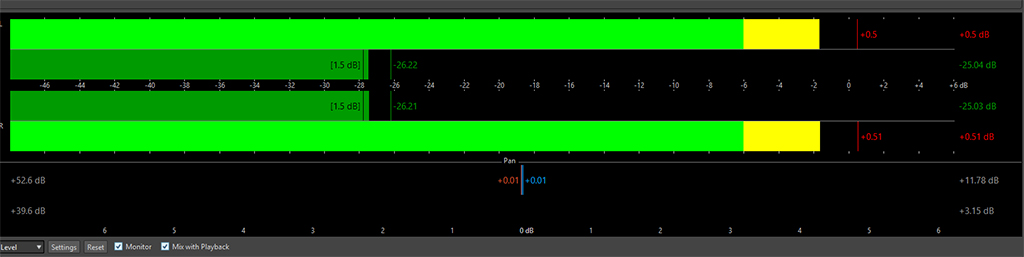
The first meter shows the level of the audio during recording. The audio is not distorted as long as it falls below 0.0dBFS (decibels in digital Full Scale) on our meter. Notice on the right, the red numbers show a value of +0.5dB. When this happens during a transfer, we will adjust the output of the playback machine and stop the recording. We will re-do the transfer so that the level will no longer exceeds 0.0dB on our meter.
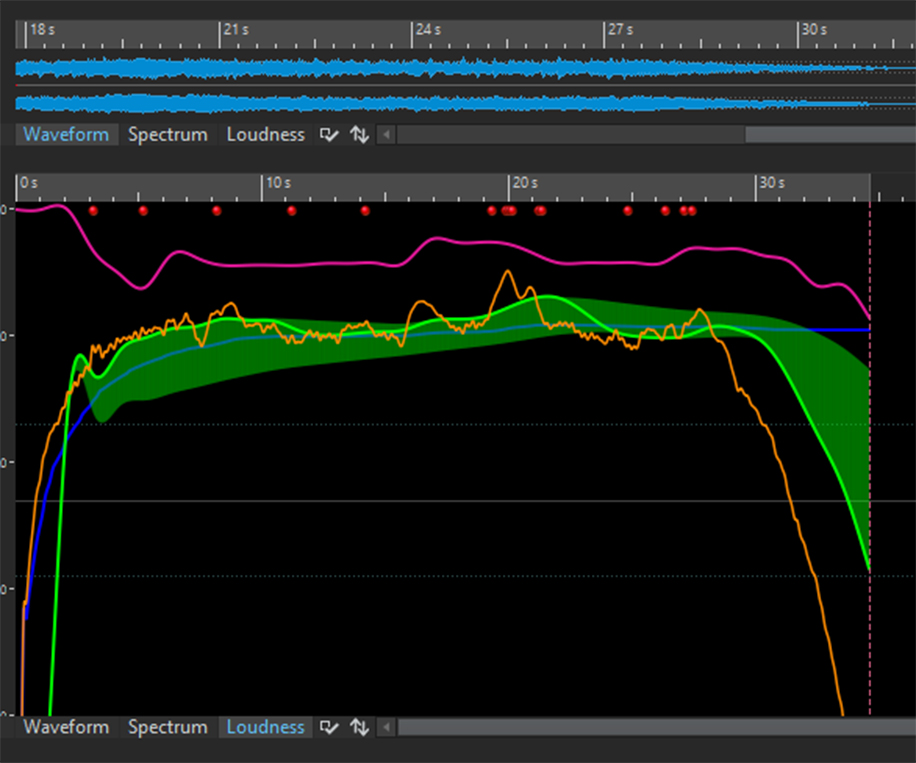
The second meter shows any clipping that occurred over time. Every red dot at the top of the window shows when the signal exceeds 0.0dB. This is a way to double-check that no clipping has occurred.
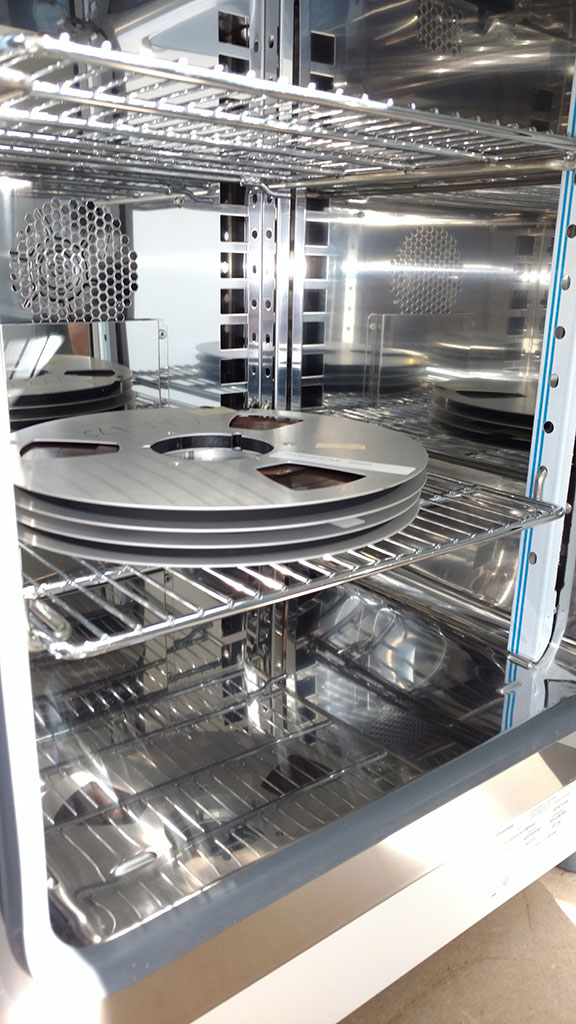 STICKY SHED SYNDROME
Another issue we look out for is “Sticky Shed Syndrome”. Sticky Shed Syndrome is a term used to describe a form of degradation that occurs with certain formulations of polyester tape. When this happens, the magnetic layer (the part of the tape with audio information) takes on moisture and will literally shed off the backing layer of the tape onto the guides and heads of the playback machine.
To temporarily stabilize the tapes for playback, the tapes need to be baked – yes, baked! But we’re not going to audition for the Great British Baking Show any time soon; this is slightly different. At NEDCC, we use a lab-grade incubator to bake the tapes. The incubator keeps the tapes at a consistent temperature for the desired amount of time. Tapes with SSS need to be baked at 50-55 degrees C for 10 to 12 hours. This effectively evaporates the excess moisture and gives us time to transfer the tape without destroying the audio.
While some vendors bake every polyester tape before transfer, we bake on an “as-needed” basis. This is because the baking process slightly degrades the audio quality[1]. Therefore, tape baking is a compromise that is well established among professional preservationists. It’s better to bake a tape and have slight signal degradation than to not bake a tape and destroy the audio during playback.
Client Considerations: Attended or Parallel Transfers?
There are two established ways to digitize audio: attended transfers and parallel transfers. As described above, we perform attended transfers at NEDCC. But to reiterate, attended transfers involve digitizing one item at a time with a trained engineer listening to the item from beginning to the end. Parallel transfers involve digitizing multiple items at the same time where the operator will spot-check each item and rely on software to detect some issues.
Attended transfers are best for the most accurate digitization of your analog materials. Many of the issues discussed above can only be detected by attentive critical listening. As shown in the “clipping” example, there is software that can detect certain issues but it cannot identify things like speed changes or variations in track configuration. Additionally, these problems are hard to distinguish by looking at meters or at the waveform of the audio. You have to hear it!
When any of these issues occur in a parallel transfer situation, the burden of quality control falls upon the collection’s archivist or curator. Furthermore, he or she might not even know when there is a problem with their audio asset. Rather, with attended transfers, any issues that may arise will be noticed and addressed by the preservation engineer on the spot and the issue will be resolved.
Preserving Unique, Irreplaceable Recordings
NEDCC’s hands-on, 100% attended approach is the safest method of preserving those one-of-a-kind, historically significant recordings.
 Audio Preservation Engineer Karl Fleck comments on his work at NEDCC:
It’s hard to single out my favorite part of the job – there’s so much to it and it fits my personality so well. I love audio, history, and music. This combines all of those elements.
I really enjoy the sense of discovery and the diversity of the collections that I’ve worked on. And I have a personal passion for American folk music; I play the mandolin and guitar. So, some highlights of client materials for me include collections of folk music, blues, and bluegrass.
NEDCC is grateful to the Andrew W. Mellon Foundation for their support for the expansion of our Audio Preservation services.
[1] (Presentation by Dr. Fenella G. France, Chief, Preservation Research and Testing Division, Library of Congress, at the “Audio Media Preservation Through Imaging Conference” at the Library of Congress, Washington, D.C., July 17, 2015.).
Story by Karl Fleck, NEDCC Audio Preservation Engineer
December, 2019
Special thanks to Kevin Roe for use of his Velvet Underground open reel audio tape used to make these examples.